Feeds:
Posts
Comments

Archive for the ‘Structural aspects’ Category

Windcatchers have been employed for thousands of years to cool buildings in hot climates. The windcatcher is able to chill indoor spaces in the middle of the day in a desert to frigid temperatures.

Windcatchers have been employed for thousands of years to cool buildings in hot climates. The windcatcher is able to chill indoor spaces in the middle of the day in a desert to frigid temperatures.


The following list includes dozens of low tech, low cost ways to cool buildings in hot climates passively without electricity or machinery, i.e., passive cooling or natural cooling. This list is in addition to the 11 or so simple passive cooling techniques that I talked about in my video the other day. Altogether there are over 50 practical methods for cooling your home sustainably. Despite all these wonderful methods, most people – at least in North America – live in poorly insulated boxy houses with costly, wasteful air conditioners. This is one example of “ignorance is not bliss”.
– night cooling: open the windows at night to let in cooler, fresher air.
– roof vents for improved ventilation. This could include a ridge vent and cupola.
– gable vents on gable end walls
– adequately shaded clerestory windows
– smaller windows on the east and west to prevent overheating (if the walls aren’t shaded)
– louvers and vents
– well located doors
– 50-100% more or larger windows on the leeward side than the windward side to help hot air to escape
– earth berming with moist vegetation such as grass
– keeping vegetation moist around the house to help cool the breezes (the yard)
– planting trees to funnel air toward your house
– plant trees that don’t block breezes
– wing wall to direct cool breezes into the home
– building on stilts
– stack effect: multi-story designs can be very effective at encouraging natural convection
– open plan living areas that encourage air circulation
– narrow floorplans
– orientation to catch breezes more effectively
– location: breezy locations near lakes, etc.
– outdoor living areas
– porches/verandas that shade the walls
– shaded, high thermal mass walls such as earthbags, adobe, etc.
– windscoop/windcatcher (with possible addition of a water element)
– evaporative cool wall such as double terra-cotta brick walls (low fired brick) filled with moist sand
Venturi effect
– solar chimney: chimney designed to heat air and draw air from the house
– atrium or sunroom: can act like a solar chimney if properly designed
– basement: upper floors draw cool air upwards from the basement
– cool pantry and rootcellar
– well, open air cistern or underground water canal in the basement
– earth tubes in dry climates where mold is not a problem and digging is fairly easy
– roof insulation and reflective roof insulation
– fly roof (secondary roof over the main roof)
– green roof/living roof
– soffit vents and baffles between rafters to improve roof ventilation
– light roof color that reflects sunlight
– manmade water feature such as a lily pond on the windward side
– awnings (if you don’t have large roof overhangs)
– inner courtyard/open atrium
– pergolas and trellises to shade walls
– minimize sun reflection and re-radiation from surrounding environment: plants versus gravel or pavement
– blinds: close if sunlight is entering window
– avoid skylights unless openable and tinted
– smooth plaster reflects more light than textured plaster

Note: This is just a list of practical cooling strategies. There are plenty of ‘yeah, buts’ you should be aware of to prevent problems. There isn’t time or space here to cover everything. A fair amount of research is required to learn the details so you can optimize the passive cooling design for your home and building site.

Image source: Wiki – Windcatchers (good info on windcatchers)
Good reference with more details: Passive Cooling at House-Energy.com

Read Full Post »


Demonstration wall showing cordwood stacked on earthbag bag foundation (click to enlarge)

Demonstration wall showing cordwood stacked on earthbag bag foundation (click to enlarge)


Demonstration wall showing cordwood stacked on earthbag bag foundation (click to enlarge)

Demonstration wall showing cordwood stacked on earthbag bag foundation (click to enlarge)


There are a lot of little details you can search on the Internet. This is just a basic introductory video to show you the cordwood/earthbag concept. What I like to do is have the mortar recessed slightly. It looks a little better if the wood is protruding slightly. You smooth this out. The mix is very similar — it’s basically cob. You could also call it earthen mortar.

Here is my general impression of cordwood construction. It’s extremely beautiful. It’s very practical in certain areas where you have an abundant wood supply. But it’s very labor intensive. Earthbag is several times faster. So it’s very slow. What I would recommend for most people is maybe just use it around a doorway, an entryway, because it’s very beautiful. Maybe around your fireplace, something like this, because it’s very beautiful. You can search the Internet and see some really beautiful examples of cordwood construction.

You can watch almost 100 videos at Earthbag Natural Houses YouTube channel. Each step of instruction, including how to make gravel bag foundations, is shown in detail.
Earthbag Instructable: steo-by-step earthbag building instructions

Read Full Post »

Top view of double pallet wall with post and beam frame

Top view of double pallet wall with post and beam frame


Wooden shipping pallets are typically available for free and are very practical for building homes, furniture and many other things. We’ve already explored several ways of building pallet walls: Post and Beam Pallet Wall, Earth Lodge Pallet Walls, Interior Pallet Walls, Straw Bale Pallet Walls.

This new design sprang from the idea of creating wider pallet walls to provide space for extra straw/clay insulation or other type of insulation. Total wall thickness is about 16” not including plaster and/or wall cladding. Note how the good side (top side) of pallets all face outward. The building process is as follows:
1. Construct the post and beam frame. In this proposed design, the posts are spaced two pallets apart.
2. Build the interior pallet wall. Horizontal 2×4 or 2×6 plates are attached at the base, between courses of pallets and along the top. Plates could be 3’-4’ salvaged boards from broken pallets.
3. Add a spacer board between the pallet walls to help stabilize the wall. This could consist of short pieces of scrap blocking or a long board.
4. Build the exterior pallet wall so the outer surface aligns with the outside of the posts. Some partial pallets are required. Partial pallets could be cut from damaged pallets.
5. Mix and stuff straw/clay inside the pallet wall.

Read Full Post »


These homes are looking better and better. The second video shows the construction of 11 SafeT homes in a Haitian village that were built in just one week. In addition to the advantages mentioned in our previous blog post about these Grain Bin Homes, the homes are engineered, include screened soffit vents and a central roof opening, solid steel door, gutters for roofwater collection, window screens and lockable window shutters to resist strong winds up to 150 mph. And, as pointed out previously, the steel is over 95% recycled content and can be recycled at the end of it’s 70 year life span.

Update: Update: Sukup Grain Bins Earn 5,000 lb. Load Rating (it can hold a car on top, making them the strongest in the industry)

Sukup Grain Bins Earn 5,000 lb. Load Rating

Sukup Grain Bins Earn 5,000 lb. Load Rating

Read Full Post »

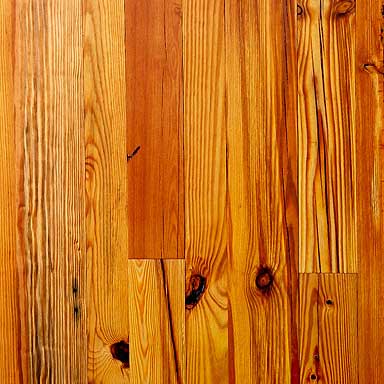
Heart pine flooring is naturally harder, and insect and decay resistant than sapwood

Heart pine flooring is naturally harder, and insect and decay resistant than sapwood


Premium heart pine flooring

Premium heart pine flooring


Reclaimed antique heart pine or ‘naily heart pine’

Reclaimed antique heart pine or ‘naily heart pine’


Antique heart pine illustrating how the color deepens with age

Antique heart pine illustrating how the color deepens with age


From Woodweb.com:
“What is heart pine?
Heart pine is the actual heartwood of the tree. Since pine used to be quite large when it was logged some hundred years ago, the pine trees were able to grow large enough to develop heartwood. Now that is not the case, as pine trees do not grow as big because they are harvested at an earlier age.

The “heart” is dark colored. It is decay resistant and more stable than the white/yellow sapwood.

Heart pine is generally considered to be recycled timber from first generation trees (trees that were standing when the first settlers landed in the 1600s). I believe most of the trees were long leaf pines, many as old as 300+ years. There were probably some other pine species mixed in, but the predominate tree was the long leaf. There were approximately 80,000,000 acres of these trees and almost all were gone by 1900. This wood was the primary building material for homes and factories. It is now being recycled as heart pine. Most structures built after 1900 were from second generation trees and do not exhibit the very tight rings associated with the first generation timber. So here in North Carolina heart pine being recycled is usually first generation timber with tight growth rings (I have seen as many as 30-35 per inch) and a large heartwood (usually red to yellow to orange). Anyway, if you are interested in purchasing old recycled original pine, be sure what you are getting. Prices can vary widely but, nevertheless, be prepared to pay between 5.00 to 12.00 per board foot. [Or salvage it yourself for free by helping demolish an old building.]

Heart pine does not have to be reclaimed or centuries old. It can be the heartwood of the southern pines. Often, the reclaimed or “old” pine is called antique heart pine, while pine sawn from trees today is called new heart pine.

The old mills treasured the heart because of its insect and rot resistance. There were two markets – heart pine and the less desirable sap pine. Because there were some applications where sap wood was wanted, there was still a small market for it. The trees they were sawing were, many times, filled with heartwood. Timbers and lumber were marketed with ten percent or less sapwood. The sapwood is creamy white to orange and the heartwood is reddish brown, getting darker with age. It wears better in a flooring situation too. You can still cut heart pine from trees growing today. It is just that there is not as much to go after. All you have to do is provide a board with a goodly portion of heartwood in it. Calling pine “heart pine” only because it is old and dragged from a river or because it came from an old building is just marketing. To actually be heart pine, the board must contain the heartwood of the tree.”

Source: Woodweb.com
Image source: Contemporary Floor Coverings.com
Image source 2, 3: Appalachian Woods.com
Image source: Whole Log Lumber

Read Full Post »

Trus Joist engineered wood products

Trus Joist engineered wood products


Truss joists make it easy to run plumbing and elctrical

Truss joists make it easy to run plumbing and elctrical


Many natural builders use wooden TJI engineered joists for floors and roofs. This online specifier’s guide makes it easy to determine what size TJIs to use.

From Custom Truss LLC:
“What are TJI Wooden Floor Joists?
TJI joists offer an excellent alternative to wooden floor trusses or flat roofs. These high-tech joists combine webs of O.S.B. (Oriented Strand Board) and flanges made from Microllam. They are patterned after steel I-beams. Next time you pass a commercial construction project take a look at the steel beams. Shaped like an ‘I’ they have very narrow centers with heavy flanges on top and bottom. Look how much weight they can support. Wooden TJI joists work the same way.

Why use Wooden TJI Joists?
TJI joists can use as little as one-third of the wood used in traditional sawn lumber. Resource-efficient, engineered wood TJI joists are manufactured to resist the shape-changing effects of temperature and moisture. Long length, lightweight and versatile, TJI Joists use an innovative design to help prevent squeaky floors and can be easily drilled and cut for plumbing and ductwork.”

From Woodbywy.com:
“Advantages:
• Uniform and Predictable
• Lightweight for Fast Installation
• Resource Efficient
• Resists Bowing, Twisting, and Shrinking
• Significantly Reduces Callbacks
• Available in Long Lengths
• Limited Product Warranty

Why Choose Trus Joist® TJI® Joists?
• Engineered for strength and consistency
• Efficient installation saves time and labor
• Longer lengths allow more versatile floor plans
• Less jobsite waste
• Fewer red tags and callbacks”

Text and images source: Custom Truss LLC
Source text and specifier’s guide: Woodbywy.com

Read Full Post »

Diagram illustrating the coppicing cycle over a 7-20 year period

Diagram illustrating the coppicing cycle over a 7-20 year period


Coppicing is a highly effective method of producing a great deal of fast growing, sustainable timber without the need to replant.

Coppicing is a highly effective method of producing a great deal of fast growing, sustainable timber without the need to replant.


Coppiced wood has all sorts of practical uses for natural builders – sustainable fuel source, pole building, wattle and daub, pinning, braces, latilla ceilings and more.

“Coppicing is a traditional method of woodland management which takes advantage of the fact that many trees make new growth from the stump or roots if cut down. In a coppiced wood, young tree stems are repeatedly cut down to near ground level. In subsequent growth years, many new shoots will emerge, and, after a number of years the coppiced tree, or stool, is ready to be harvested, and the cycle begins again.

Typically a coppiced woodland is harvested in sections or coups on a rotation. In this way, a crop is available each year somewhere in the woodland. Coppicing has the effect of providing a rich variety of habitats, as the woodland always has a range of different-aged coppice growing in it, which is beneficial for biodiversity. The cycle length depends upon the species cut, the local custom, and the use to which the product is put. Birch can be coppiced for faggots (bundles of brushwood) on a three or four year cycle, whereas oak can be coppiced over a fifty-year cycle for poles or firewood.

Coppicing maintains trees at a juvenile stage, and a regularly coppiced tree will never die of old age—some coppice stools may therefore reach immense ages. The age of a stool may be estimated from its diameter, and some are so large—perhaps as much as 5.4 metres (18 ft) across—that they are thought to have been continuously coppiced for centuries.

The shoots (or suckers) may be used either in their young state for interweaving in wattle fencing (as is the practice with coppiced willows and hazel) or the new shoots may be allowed to grow into large poles, as was often the custom with trees such as oaks or ashes. This creates long, straight poles which do not have the bends and forks of naturally grown trees.”

Source: Wiki
Image source: Coppice.co.uk

Read Full Post »

When Technology Fails by Matthew Stein

When Technology Fails by Matthew Stein


“I PROTECT YOUR INVESTMENT!
Global Warming Equals Increasing Fire Danger
Build a Durable Fire resistant Structure
Fire Resistant Roofing
Fire Resistant Decking
Maintain a Defensible Space
II LESSONS FROM THE 1993 LAGUNA BEACH FIRE – WHAT SURVIVED?
– Many if not most homes burned from the inside out (fire storm heat ignited interior curtains, etc)
– Stucco, or cement walls preferred. If wood siding, apply over 5/8 sheetrock fire wall for improved fire resistance.
– All projections (roof eaves, etc) protected on underside with cement plaster, or sheathed with cement board (Certainteed, Hardie, etc.) for a wood look.
– Minimize venting, screened at openings to prevent flaming embers from entering vents. Removable fires stop vent blocks in place during periods of high fire danger.
– Coat wood decks with Pacific Polymers urethane deck covering or treat with fire resistant coatings
– Well insulated, well sealed envelope, and high thermal mass slow interior heating and ignition.
III GREEN & FIRE RESISTANT
SCIP (Structural Concrete Insulated Panel) i.e.: ICS 3D Panel
Straw Bale
ICF (Insulated Concrete Forms)
COB
ADOBE
PISE / Rammed Earth [and Earthbag]
SIP (with cement board siding)
I.E. Concrete Based, Earth Based, or fill the wall with foam or straw so no chimney effect and sheath with cement board or stucco!”

Source: When Technology Fails
Maybe earthbag will get included in the list in the next publishing cycle.

Read Full Post »

There are many advantages to pole building, including speed, ease and lower cost of construction.

There are many advantages to pole building, including speed, ease and lower cost of construction.


Pole building under construction.

Pole building under construction.


Here are a few facts gleaned from Low Cost Pole Building Construction, by Ralph Wolfe and Practical Pole Building Construction, by Leigh Seddon.
– Adaptable to steep terrain, rocky soils, marshes, beaches, earthquake and hurricane zones. For instance, you can save a lot of money by building on low cost hillsides.
– Meets building codes and FHA requirements.
– Poles serve as foundation, structural frame and wind bracing.
– Building with poles saves labor, time and materials. For instance, you can typically save thousands of dollars in comparison to building a concrete foundation.
– Total cost is often 15%-25% lower than standard construction or about half the cost of a contractor-built house.
– Roof can be built before the walls.
– Round or square poles can be used, although round poles of the same size are 18% stronger.
– Poles are more fire resistant than stick frame houses.

Can’t afford the book? Take a look at this free ebook on Pole Building Construction

Low Cost Pole Building Construction
Practical Pole Building Construction

Image source: Sherman Pole Buildings
Image source: Cascade Building Concepts

Read Full Post »

Post and beam frame built with standard wood connectors (click to enlarge)

Post and beam frame built with standard wood connectors (click to enlarge)


1. Post base

1. Post base


2. Wall bracing

2. Wall bracing


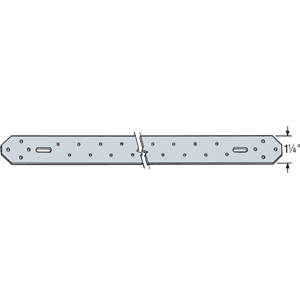
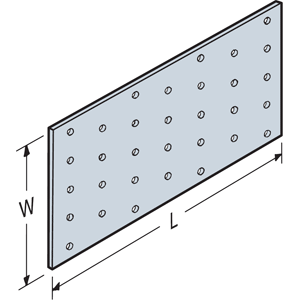
3. Tie plate

3. Tie plate


4. Post cap

4. Post cap


5. Hurricane tie

5. Hurricane tie


Numerous readers have requested advice on the quickest, easiest way to build post and beam frames. I suggest using standard galvanized metal wood connectors by companies such as Simpson Strong-Tie. (I’m referencing Simpson anchors because they’re widely available. Shop and compare. All brands meet code.) Deciding which connectors to use can be a bit confusing since there are hundreds to choose from. Post bases on a small porch, for instance, usually don’t need to be as securely anchored in the concrete as a house. For a porch, it’s usually more important to raise the posts to prevent moisture damage, so a different post base may be used than what is shown here. And to add to the challenge of selecting the right ones, connectors go by different names. Wall bracing may be called sway bracing, a post cap may be called a beam anchor and so on. The drawing above shows a typical example. Other similar connectors could be used, but the ones shown here will get you started in the right direction.

Images source: Simpson Strong-Tie

Read Full Post »

Older Posts »