Feeds:
Posts
Comments

Posts Tagged ‘earthbag foundation’

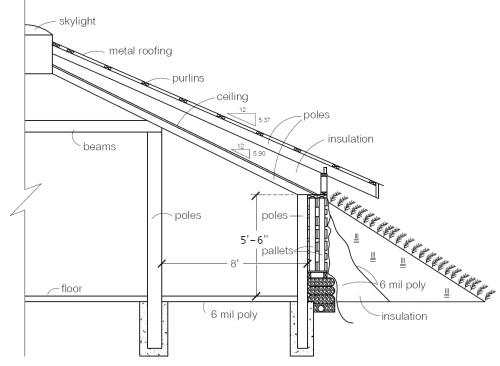
Post and beam pallet wall for a dirt cheap earth lodge (click to enlarge)

Post and beam pallet wall for a dirt cheap earth lodge (click to enlarge)


From time to time we answer reader’s questions. Here, numerous emails have been combined and edited for brevity.

Rex:
My goal is to learn to build houses with local materials in order to help people in my area build sustainable debt free homes. I’m in love with your Earthbag Lodge plan as I had previously designed one very close to that concept before seeing it. My other main goal is optimal climate control with earth and the freedom that brings.

For the lay person, such as myself, deciding whether a living roof vs. a more conventional metal roof system is best in terms of interior climate control, insulation, etc. Are the benefits of an earthen roof worth the process? A living roof seems more difficult to waterproof without the costly membrane. I have lots of dirt, juniper poles and pallets. Straw bales are out of the question as they are $10-12 a bale around here. I LOVE the earthbag concept. I’m just brainstorming a bit more as I reconsider what is available in bulk and free. Thanks for all the time. The part of Texas I live can get very cold in the winter and is very hot in the summer. I’ve been talking to several friends and really turning them on to the idea of self preservation and taking back our housing needs from the commodity black hole. Keep of the fine work!

Owen: Utilizing low cost and free materials where you live is the way to go. Even though I’m a huge fan of earthbags, you always want to consider different options and decide what makes the most sense for you. Since you have lots of free pallets and rot resistant juniper poles then consider building a double pallet wall on an earthbag foundation as shown in the drawing above. This method may be a little faster than building entirely with earthbags and use fewer bags. (I’m assuming you have access to a chainsaw and posthole auger to speed the work.)

The whole process of building a roof that can withstand the heavy load of a living roof, and the time and effort for waterproofing, insulating, making the living roof AND maintaining the plants over time, which is a huge amount of work in itself, would tip the scale for me to pole roofs or framed roofs with lots of insulation, and metal roofing to collect roofwater (super important in dry areas). I suggest a double pole roof that is supported by a post and beam frame. This would be way faster to build than a living roof. It would be low cost, owner built and provide lots of space for insulation. You can achieve zero energy housing with both systems, so my vote is for a more conventional insulated roof with metal roofing.
Read Full Post »

The Arts Center Hastings includes earthbag foundation, straw bale walls and many other sustainable features.

The Arts Center Hastings includes earthbag foundation, straw bale walls and many other sustainable features.


The Arts Centre Hastings was designed by Chris Magwood and Ingrid Cryns, and built by the students of the 2007 Sustainable Building and Design program at Fleming College, under the direction of Chris Magwood and Ali Lam. Located in the Madoc Skate Park in downtown Madoc, Ontario, the project was funded by the Municipality of Centre Hastings. The building is designed to host indoor performance events for up to 80 people, and outdoor performances for up to 500. A slideshow showing each step of construction is here.

Arts Center Hastings
Chris Magwood.ca
Endeavour Centre

Read Full Post »


In this video, David Reed of Texas Natural Builders kindly shows us his work with developing the right plaster mix for the pallet house near Pine Ridge. This is his first full-house pallet build and his first in a severe hot-and-cold-weather climate like ours. Critics of natural building often say that natural building is not a good fit for our climate, and natural builders are in some ways blazing new territory with each building project. Plaster has been used elsewhere in the area before, by previous generations, of course, but these old ways are being improved upon by the new generation of natural builders with some trial-and-error learning a given. Reed has over twenty years experience as a conventional builder, before moving to more sustainable methods.

Texas Natural Builders
Pallet Houses

Read Full Post »

Pallet wall (click to enlarge)

Pallet wall (click to enlarge)


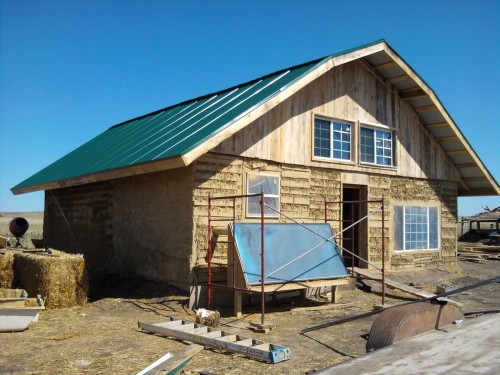
Pallet wall home with solar space heater

Pallet wall home with solar space heater


Pallet home by Texas Natural Builders

Pallet home by Texas Natural Builders


Pallet building is a hot topic and so the next few blog posts will explore various aspects of building with pallets — from entire houses, to interior pallet walls, to pallet wall cladding. Over 4 billion pallets are currently in use, so this is an abundant, easily obtained and usually free resource. Excerpts below about pallet building by David Reed of Texas Natural Building, a pallet house expert.

“I have been building residential homes for 24 years, I know structural stability inside and out, the strength of a pallet home is comparable to that of a conventionally framed home. In the smaller homes we design we have found that a staggered brick like installation is not needed and we try our best to find pallets exact or as close as possible in size, the installation process is as follows:

Once we decide on the foundation type, typically we always try to keep concrete forms out of our choices, we secure scrap 2×4 cleat blocks to the foundation, set back about 1/2″-5/8″, then slip the pallets over the blocks and secure them with screws horizontally into the cleats, toe screw the 2×4 frame of the pallet into the foundation as we level each one. We clamp each pallet together with C -clamps and fasten together with screws and sometimes carriage bolts, we butt corners with lapping pallets ends, and repeat this process as a soldier course along the perimeter of the foundation.

The top of the first course of pallets gets a continual 2×4 plate that is screwed down into the tops of the 2×4 frame of the pallets, this allows the pallets to be force straightened and gives it some pretty powerful rigidity!! We then install the second course of pallet just like the first, windows and doors are framed either as bucks or conventional trimmers and headers. A 2×4 top plate is installed on top of the second course and marks for joists and rafters which are installed conventionally.

In larger homes, we have found that we do have to stagger the pallets in long runs or insert a vertical 2×4 every 8′ for lateral strength. We cut pallets to fit re-using all of the materials as much as possible. We have other plate installation methods of installed on a earthbag stem wall or a cob or strawbale stem wall as well as rock using box beams as base plate and top plate with a 2×8 as the center horizontal plate. Once the pallet walls are up to the 8′ height then I come back measure and mark for the windows and then cut the opening out, frame it and pop them in!!

There are two types of wooden pallets made, HT (heat treated) and MB (Methyl-Bromide), we only use heat treated pallets in our designs and builds.

We use all natural materials as insulation, in this case being light straw clay which has an insulation value of about 1.5 per inch. We then add an adobe plaster (earth plaster) on the interior and exterior of the structure, this is typically local materials sources right from the build site! This provides both insulation and thermal mass!”

Image source 1 Pine Ridge Post-Reservation
Image source 2 Global Giving
Image source 3 I Love Cob.com
Pallet Houses
Texas Natural Builders Facebook page
The Dude Abides YouTube channel
Pine Ridge Pallet House

Read Full Post »

Earthbags make great insulated foundations and platforms for yurts.

Earthbags make great insulated foundations and platforms for yurts.


I posted an idea for Insulated Earthbag Foundations for Yurts at Instructables.com. One reader who left a comment liked the idea, but needed a simpler design so he wouldn’t have to get a building permit. Here’s an idea for a very simple design that might get around building codes. Stack one course of earthbags in a circle and then fill the center area with sand, sand/gravel mix or an insulating material such as scoria. Spike the bags in place with saplings to prevent slippage. Berm earth against the earthbags to protect from UV rays and help hold them in place. The floor could be topped with a 2″ layer of subsoil to create a temporary tamped earth floor.

I know it’s rather crude, but it’s also super low cost, quick and easy. No concrete or lumber required, which means almost zero cost if you use recycled bags, and it should bypass the codes because it’s only ‘temporary’. (Har, har. This could last indefinitely if the bags aren’t exposed to sunlight, but don’t tell that to the code officials.)

Read Full Post »

Concealed underfloor cool pantry made with gravel bags (earthbags filled with gravel)

Concealed underfloor cool pantry made with gravel bags (earthbags filled with gravel)


Concealed underfloor cool pantry made with insulated concrete forms (ICF)

Concealed underfloor cool pantry made with insulated concrete forms (ICF)


Maybe it’s all the freakish hurricanes, tornadoes and floods that have been occurring that got me thinking about how to increase storage space for emergency supplies. There have been countless cases of hard times in the past; times of plenty don’t last forever. Why not stock up on a few things as you see them on sale? It’s better to be safe than sorry, as they say. You might want to buy basic supplies with a long lifespan in bulk – the things you’re going to buy anyway – as a hedge against inflation. Or maybe you want the comfort, convenience and peace of mind that comes from having a surplus of healthy food and other supplies to save trips to the store and be able to help others if there’s an emergency.

The most common and effective storage method for food in many cases is 5-gallon plastic buckets with sealable lids. Buckets like this can often be obtained for free from delis, bakeries and restaurants. There’s an abundance of information on the Internet for storing food in these containers, just google it. (LDS has an excellent site.) You’ll also need a safe, cool and preferably concealed place to store everything. (Looters can’t take what they can’t find.) So where do you put everything? Many homes are too small; attics and garages often too hot. Rootcellars have high humidity, are highly visible targets for thieves, and create some inconvenience if not attached to the home. A cool pantry attached to the side of your home that keeps food cool without electricity is a great solution in normal times, except this would put all your supplies in plain sight and increase the risk of vandalism during problem times.

Consider building a flood resistant, low cost, concealed underfloor cool pantry. It could be built under a new home, new addition, covered porch, free standing storage sheds, garages, shops, etc. While you could possibly adapt a crawlspace under your home, I suggest a much more water resistant and totally concealed design that’s made specifically for this purpose and I just the right size.

There are countless ways to build one of these underfloor cool pantries, so all I’ll do here is summarize the basic concepts. The first priority is keeping water and excess humidity out of the underfloor pantry. If water gets into the space for any reason (100 year flood, melting snow from a blizzard, plumbing leaks, etc.) then your whole stockpile is at risk. Because it’s in a low spot, it wouldn’t take long for an underfloor pantry to fill with water. So be sure to take all the necessary precautions if you decide your area is appropriate: build on high ground and/or raise the site well above flood stage, and be sure to totally waterproof the foundation with waterproof plaster and a moisture barrier. Eliminate any seams that might leak, such as the joint between the foundation and floor slab. In addition, you might want to add a humidity gauge in an easy to access location. Keep a close eye on things so you can react to any problems as quickly as possible.

The second priority is choosing appropriate materials for your area. Maybe you live in a cold climate and have to meet building codes. Insulated concrete forms would be one good option. Follow the manufacturer’s guidelines and local codes.

If you’re building with earthbags (which typically means non-code areas), then consider using a gravel bag foundation that’s appropriately reinforced. This application is different than typical gravel foundations due to the extra height. Reinforcing is needed to resist the horizontal thrust of the soil. Be sure your soil is not expansive clay. At a minimum, use opposing vertical rebar pins tied together through the wall. This works best on small, round structures such as domes and roundhouses. For straight runs, you’re better off using the reinforced earthbag method developed by Precision Structural Engineering, Inc.

Also note, the gravel bags could be filled with scoria or pumice to create an insulated earthbag foundation. This is a great way to build a frost-protected foundation, reduce labor, and save money on materials and long term energy costs.

Read Full Post »

Seismic Resistant Gravel Bag Foundation (click to enlarge)

Seismic Resistant Gravel Bag Foundation (click to enlarge)


Yesterday’s post was about the earthquake resistance of earthbags. Today’s post illustrates what an earthquake resistant gravel bag foundation looks like and explains why this design is so effective. Gravel is an ideal material for this application because it’s durable, reasonably inexpensive, readily available in most areas, has high bearing strength and prevents wicking of moisture up in the wall. Gravel will shift or ‘give’ during seismic activity, thereby relieving stress without causing structural damage.

The gravel is contained in polypropylene bags or tubes, double-bagged for strength. The gravel bags rest directly on a typical rubble trench foundation with a French drain that removes water from under the building. Two courses of 4-point barbed wire between courses reduce slippage and provide tensile strength. Vertical rebar or bamboo pins are placed opposite each other and tied together through the wall with sturdy baling twine. Plaster mesh, fishing net or plastic fencing is tied to both sides for additional seismic resistance. Typical soil-filled earthbags are placed on top of the gravel bags once you’re safely above where moisture can cause problems.

Gravel bag foundations score highly in every category: ease and simplicity of construction, dirt cheap cost, durability (poly bags can last 500 years if protected from sunlight) and earthquake resistance. No concrete forms needed — just a few simple tools such as a shovel. I highly recommend reviewing some previous blog posts on this subject to better understand why earthbag foundations are a favorite among natural builders.
– A similar gravel bag foundation with strawbale walls successfully passed a shake table test in Nevada with forces that surpassed that of the Northridge quake in California.
Earthbag Foundations background info
Scoria or pumice can be used in place of ordinary gravel to create a frost-protected insulated foundation. (Frost-protected foundations save energy and greatly reduce construction costs because you don’t have to dig down to frostline.)
Rubble Trench/Earthbag Foundation
Earthquake-resistant Earthbag Building Details
Low-Cost Reinforcement of Earthen Houses in Seismic Areas
Another Earthbag Foundation Method explains an alternative way of building a foundation with gravel bags.
Rubble Bags
Flood and Earthquake Resistant Earthbag Foundations in Pakistan
Reinforced Mesh Corners
Earthbag/Stone Foundations

Read Full Post »

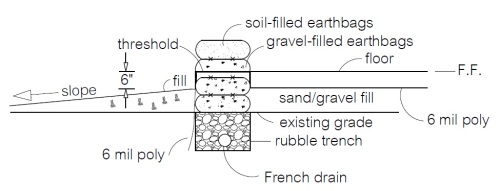
One good method to raise a structure high enough to prevent moisture damage is to build on high ground and/or raise the building site (building pad). This is what I’ve done on our earthbag structures so far. We spread out truckloads of road base where the building would go, drove a truck back and forth across the site in different directions to compress the soil and then repeated the process until the building site was about one foot higher than the surrounding area. The threshold and finished floor are 6 inches higher still. This should be sufficient to protect against water damage in our area.

Another way to raise the building and prevent water damage is to add extra courses of bags or tubes. But how do you fill the space under the floor, you may ask? At first this option doesn’t make sense because the work would have to be done by hand since you obviously can’t drive a truck inside the house. Once again, it’s scoria or pumice (also known as lava rock) to the rescue. These lightweight volcanic materials are rot proof, insulating and easy to work with. It’s sort of like shoveling popcorn. The work would go fairly quickly. You could speed things up by dumping truckloads of scoria or pumice inside the house before the walls got too high. Then all you’d have to do is spread out the aggregates. Spread the scoria or pumice later so you don’t have walk on it during the build. The key advantage to this approach is the added insulation under the floor, so this method is ideal for cold climates. The last step is to add and tamp soil around the exterior on a slope to direct water away from the building.

Read Full Post »

Step 1: Make a rubble trench foundation at existing grade.

Step 1: Make a rubble trench foundation at existing grade.


Step 2: Place gravel bags, add fill material and pour the threshold(s).

Step 2: Place gravel bags, add fill material and pour the threshold(s).


I published my preferred earthbag foundation method in my new book Earthbag Building Guide. It still seems to be the strongest method because it locks 1-1/2 courses of earthbags below grade. With this method, the site is raised prior to building the foundation with stable fill material such as road base, and compacted by driving a vehicle back and forth on top in different directions. It’s the best method I know, especially for large projects.

But it’s always good to consider alternative methods. In the drawings above you can see a second way to build earthbag foundations. The main difference is the foundation starts at existing grade and the fill material is added later. The process is divided into two main steps.
Step 1: Make a rubble trench foundation at existing grade. Dig a trench slightly wider than your earthbags, add a French drain if necessary and fill with gravel and/or rubble.

Step 2: Place at least two courses of gravel bags (double-bagged for strength) with barbed wire between courses. Add sand/gravel fill material on the inside to prevent wicking of moisture, and tamp until stable. Add and compact stable fill material on the outside so water flows away from the building. Pour a concrete threshold or build a stone threshold at finished floor height for each door. This creates a strong, level base to support the door bucks. Let the concrete dry a few days and then you can set the door bucks and continue placing earthbags.

Read Full Post »

Earthbag/Stone Foundations (click to enlarge)

Earthbag/Stone Foundations (click to enlarge)


The most recent issue of The Last Straw journal (#60) has my article about earthbag/stone foundations. The following information is just a short excerpt. You can buy the full length article from The Last Straw. The design outlined here can be used with load-bearing and non load-bearing straw bale walls, earthbag walls, cob, adobe, cordwood and other wide wall building systems. The drawing shown above has been modified to show earthbag walls instead of straw bale walls.

Polypropylene bags come in various sizes. Two common sizes are 18” and 24” wide bags. When 18” bags are stacked on top of 24” bags, there’s a ledge created that can be used to support stonework. (See drawing.)

When filled with gravel, 18” bags are about 15” wide. Filled 24” bags are about 20” wide. That leaves about 4”-5” for stonework. Consider double bagging the foundation (one bag inside another) for extra strength and durability. And, as always, protect the bags from sunlight.

Besides being extremely durable, using stone in a foundation just ‘looks right.’ A combination of stone, earthbags, and scoria as a fill material makes for a high-quality, durable, insulated foundation with many advantages.

You can purchase single issues, subscriptions and back issues from The Last Straw.

Read Full Post »

Older Posts »