Feeds:
Posts
Comments

Posts Tagged ‘earthbag house’

Windcatchers have been employed for thousands of years to cool buildings in hot climates. The windcatcher is able to chill indoor spaces in the middle of the day in a desert to frigid temperatures.

Windcatchers have been employed for thousands of years to cool buildings in hot climates. The windcatcher is able to chill indoor spaces in the middle of the day in a desert to frigid temperatures.


The following list includes dozens of low tech, low cost ways to cool buildings in hot climates passively without electricity or machinery, i.e., passive cooling or natural cooling. This list is in addition to the 11 or so simple passive cooling techniques that I talked about in my video the other day. Altogether there are over 50 practical methods for cooling your home sustainably. Despite all these wonderful methods, most people – at least in North America – live in poorly insulated boxy houses with costly, wasteful air conditioners. This is one example of “ignorance is not bliss”.
– night cooling: open the windows at night to let in cooler, fresher air.
– roof vents for improved ventilation. This could include a ridge vent and cupola.
– gable vents on gable end walls
– adequately shaded clerestory windows
– smaller windows on the east and west to prevent overheating (if the walls aren’t shaded)
– louvers and vents
– well located doors
– 50-100% more or larger windows on the leeward side than the windward side to help hot air to escape
– earth berming with moist vegetation such as grass
– keeping vegetation moist around the house to help cool the breezes (the yard)
– planting trees to funnel air toward your house
– plant trees that don’t block breezes
– wing wall to direct cool breezes into the home
– building on stilts
– stack effect: multi-story designs can be very effective at encouraging natural convection
– open plan living areas that encourage air circulation
– narrow floorplans
– orientation to catch breezes more effectively
– location: breezy locations near lakes, etc.
– outdoor living areas
– porches/verandas that shade the walls
– shaded, high thermal mass walls such as earthbags, adobe, etc.
– windscoop/windcatcher (with possible addition of a water element)
– evaporative cool wall such as double terra-cotta brick walls (low fired brick) filled with moist sand
Venturi effect
– solar chimney: chimney designed to heat air and draw air from the house
– atrium or sunroom: can act like a solar chimney if properly designed
– basement: upper floors draw cool air upwards from the basement
– cool pantry and rootcellar
– well, open air cistern or underground water canal in the basement
– earth tubes in dry climates where mold is not a problem and digging is fairly easy
– roof insulation and reflective roof insulation
– fly roof (secondary roof over the main roof)
– green roof/living roof
– soffit vents and baffles between rafters to improve roof ventilation
– light roof color that reflects sunlight
– manmade water feature such as a lily pond on the windward side
– awnings (if you don’t have large roof overhangs)
– inner courtyard/open atrium
– pergolas and trellises to shade walls
– minimize sun reflection and re-radiation from surrounding environment: plants versus gravel or pavement
– blinds: close if sunlight is entering window
– avoid skylights unless openable and tinted
– smooth plaster reflects more light than textured plaster

Note: This is just a list of practical cooling strategies. There are plenty of ‘yeah, buts’ you should be aware of to prevent problems. There isn’t time or space here to cover everything. A fair amount of research is required to learn the details so you can optimize the passive cooling design for your home and building site.

Image source: Wiki – Windcatchers (good info on windcatchers)
Good reference with more details: Passive Cooling at House-Energy.com

Read Full Post »

Saltillo floor tile (click to enlarge)

Saltillo floor tile (click to enlarge)


Yellow saltillo tile

Yellow saltillo tile


Fancy saltillo tile

Fancy saltillo tile


Saltillo tile with talaver insets

Saltillo tile with talaver insets


“Saltillo tile is a type of terra-cotta tile that originates in Saltillo, Coahuila, Mexico. Saltillo-type tiles are now manufactured at many places in Mexico, and high-fire “Saltillo look” tiles, many from Italy, compete with the terra-cotta originals.

Saltillo tile vary in colour and shape, but the majority range from in varying hues of reds, oranges and yellows. Saltillo tile is highly porous, and soaks in liquid easily. Unlike most ceramic tile, there is no glaze on the top surface of the tile. It is difficult to install as it absorbs water from the thin-set mortar, grout, grease pencils, etc. Once placed, it stains and scuffs easily if not properly sealed and maintained with a quality sealant. Saltillo is probably a poor choice for outdoor installation in freeze-thaw climates, although is a popular choice in warmer climates. During installation the tiles should be handled carefully to avoid stains that can even occur from body oils on the installer’s hands.

Another method involves soaking the tile, setting the tile then allowing it to dry, sealing the tile, then grouting. This method prevents the grout from sticking to the tile. A penetrating sealant will maintain the natural look of the tile. You should periodically test the seal by putting a few drops of water on the tile in various places. If the water is absorbed, then another coat of sealant should be applied.”

Source: Wiki
Image source: Ken’s Custom Tile
Image source: Fort Worth Brick and Tile
Image source: Mexican Saltillo Tile
Image source: CMC Design Studio

Read Full Post »


Demonstration wall showing cordwood stacked on earthbag bag foundation (click to enlarge)

Demonstration wall showing cordwood stacked on earthbag bag foundation (click to enlarge)


Demonstration wall showing cordwood stacked on earthbag bag foundation (click to enlarge)

Demonstration wall showing cordwood stacked on earthbag bag foundation (click to enlarge)


There are a lot of little details you can search on the Internet. This is just a basic introductory video to show you the cordwood/earthbag concept. What I like to do is have the mortar recessed slightly. It looks a little better if the wood is protruding slightly. You smooth this out. The mix is very similar — it’s basically cob. You could also call it earthen mortar.

Here is my general impression of cordwood construction. It’s extremely beautiful. It’s very practical in certain areas where you have an abundant wood supply. But it’s very labor intensive. Earthbag is several times faster. So it’s very slow. What I would recommend for most people is maybe just use it around a doorway, an entryway, because it’s very beautiful. Maybe around your fireplace, something like this, because it’s very beautiful. You can search the Internet and see some really beautiful examples of cordwood construction.

You can watch almost 100 videos at Earthbag Natural Houses YouTube channel. Each step of instruction, including how to make gravel bag foundations, is shown in detail.
Earthbag Instructable: steo-by-step earthbag building instructions

Read Full Post »


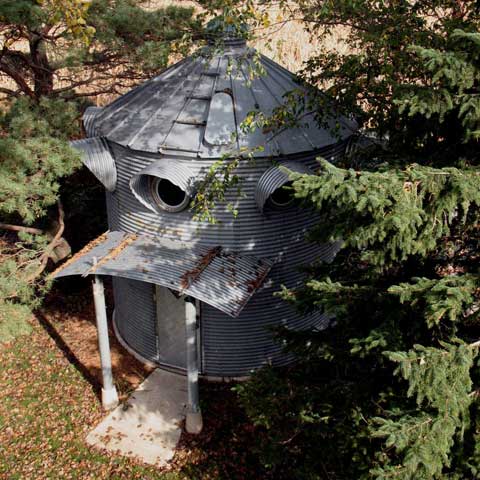
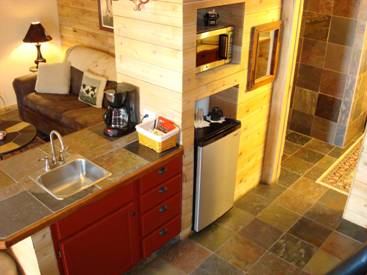
It really helps to see finished examples of what others have done. Once again it’s YouTube to the rescue.

Cornell University’s Silo House
Glenburn Silo Home
Silo House aka The Cabin in the Woods (low quality footage but has some good points)

Read Full Post »


Today I want to talk about passive cooling strategies for keeping your home cool in hot climates. This is a very hot climate and yet our earthbag roundhouse is about 15 degrees Fahrenheit cooler inside than out. So 15 degrees Fahrenheit, 8 degrees Celsius temperature difference with no mechanical cooling systems. No air conditioners, no fans, no anything. It’s just passive strategies, natural strategies for keeping the home cool without the use of machinery or electricity. So we’ll discuss about 11 different strategies that you can use. They’re all very low cost and simple.

The first one is the color of your wall — your exterior wall. You want the walls to have a light color so they reflect sunlight. One of the most important things is to have wide roof overhangs. This is about 4 feet, a little over one meter. So the sun almost never hits the wall. Because they’re high mass walls, if the sun hit the walls frequently, that mass would heat up and eventually that heat would transfer inside. So we keep the sun off the walls as much as possible.

Another important strategy is windows. We have casement windows that swing open and catch the prevailing breezes. So the breezes come from this way and these are like a scoop — a wind scoop — to pull the wind into the roundhouse. We also have windows on all sides of the house so the breeze is always blowing through.

If you look up above the window, we have screened openings above the windows that keep insects out, but let hot air escape this way. I don’t know if you can see it, you might want to come closer. Above the bond beam is a gap of a few inches. In between the rafters there’s a gap where hot air can escape. So the hot air is rising and it goes out the top. Also we use thatch roofing and some air passes through the thatch. We also have one of these screened openings above the door as a transom.

Let’s go inside and I’ll show you the earth coupled floor. This is our earth coupled floor right here. What that means is the floor — the high mass floor — in this case concrete, but it could be tamped earth, stone, CEBs, brick, recycled brick, whatever. The floor is in direct contact with the earth underneath with a moisture barrier to prevent wicking of moisture. So the floor is absorbing the coolness of the earth. It’s very cool, surprisingly cool even in this hot climate where you can start sweating in just a few minutes. So this is surprisingly cool. We also have earthen plaster on the inside. All that mass and this mass partition wall [and earthbags] all absorb the coolness of the earth — the coolness coming up from the earth. And the breezes help all the hot air escape. So the temperature inside stays the same night and day. You don’t need an air conditioner or even a fan. It’s surprisingly comfortable in here.

Some other strategies — you want to look up and see the high ceiling, so there’s plenty of space for hot air to rise and escape. There you can see the gap above the bond beam to improve ventilation.

The last strategy I’m going to talk about is vegetation — using plants to keep the building cool. Here we’ve used a mango tree on the hot southwest side of the house. That’s the hottest direction. We have different plants here. So the sun, as you can see, almost never hits the house directly. And also we have a very large tree above here that protects and shades the house through most of the day. Again, these are all simple, low cost strategies that anyone can do. Very low cost, very simple. You can save a lot of money on energy bills and also help the environment.

Almost 100 videos at Earthbag Natural Houses YouTube channel.

Read Full Post »

Nice entryway on traditional home

Nice entryway on traditional home


Universal design home entry

Universal design home entry


Timber frame entry

Timber frame entry


Nice entry to custom straw bale home

Nice entry to custom straw bale home


Your home’s entry and entryway are the first things people see when they enter your home, and so it’s important for these areas to be inviting and attractive. To help design this area, imagine yourself visiting your home. What is your first impression? Is it one of warm, welcoming colors? Is there a place to hang your coat and put your umbrella and bag? What about a mirror, artwork, lighting and place to sit down and take off your shoes? Is the flooring durable enough to withstand wear and tear? Is the space large enough for a group of people to enter and close the door behind them? Is there a protected entry and adequately sized coat closet nearby? Careful thought on these and other considerations will improve the design and livability of your home.

Image source: Nush Designs Blogspot
Image source: Gant Construction
Image source: Hybrid Timber Frame
Image source: The Watch (interesting story about the house)
Related:
8,250 Entry Design Photos
Airlock Entryways (good for cold climates)

Read Full Post »

Grand Canyon Desert View Watchtower (click to enlarge)

Grand Canyon Desert View Watchtower (click to enlarge)


View of eastern Grand Canyon from Desert View (click to enlarge)

View of eastern Grand Canyon from Desert View (click to enlarge)


Looking up inside the Watchtower (click to enlarge)

Looking up inside the Watchtower (click to enlarge)


Kabotie Mural in Desert View Watchtower

Kabotie Mural in Desert View Watchtower


“Build a structure that provides the widest possible view of Grand Canyon yet harmonizes with its setting: this was architect Mary Colter’s goal when the Fred Harvey Company hired her in 1930 to design a gift shop and rest area at Desert View. Colter’s answer was the Watchtower.

A perfectionist, Colter scrutinized every detail, down to the placement of nearly every stone. Each stone was handpicked for size and appearance. Weathered faces were left untouched to give the tower an ancient look. With a lavish, highly publicized dedication ceremony, the Watchtower opened in May 1933.

The Indian Watchtower is at the eastern end of the south rim of the Grand Canyon. From a distance the building’s silhouette looks like the Anasazi watchtower it was meant to mimic. In actual size the tower is considerably larger than any known Anasazi tower. In plan the structure is composed of one enormous circle at the north, a small circle at the south, and gently arced forms connecting the two. The largest circle and the arced portions are the sections of that building that are just one story in height. The smaller circular plan is for the tower itself, more than five stories high. The building sits out on a promontory overlooking the Grand Canyon.

The most noteworthy aspect of the exterior is the stonework–a variety of uncoursed rubble below and coursed sandstone above, with decorative patterns of triangular stones adding architectural interest directly below the tower’s parapet and other bands of color masonry adding even more visual interest.”

Text and image source: Grand Canyon Desert View Watchtower
Image source: Field Studies in the Grand Canyon Region
Image source: Adam Schallau.com
Image source: Flickr

Read Full Post »

Nice grain bin house (click to enlarge)

Nice grain bin house (click to enlarge)


Grain bin home

Grain bin home


Another grain bin house

Another grain bin house


Stuccoed grain bin home

Stuccoed grain bin home


Grain bin apartment

Grain bin apartment


Interior view of grain bin apartment (follow the link below to see more stunning pics)

Interior view of grain bin apartment (follow the link below to see more stunning pics)


Our recent blog posts about Sukup SafeT Homes and SafeT Home Videos proved popular, so I thought readers might enjoy seeing a few more grain bin homes.

Image source: Little Homestead in Boise
Image source: Mother Earth News
Image source: Greenieweenie
Image source: EcoFriend
Image source 5, 6: Travel Shack
Related:
Mother Earth News: Convert a Used Grain Bin to a New House (best article I’ve found so far on grain bin houses)

Read Full Post »

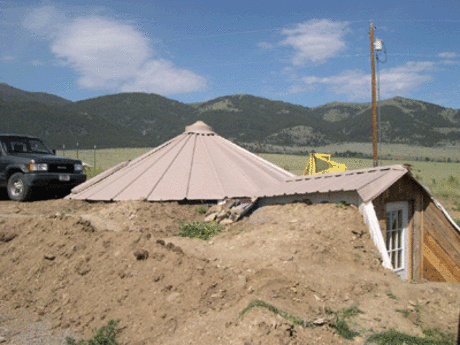
Grain bin root cellar

Grain bin root cellar


“This is a root cellar we built out of an old grain bin that was going to be sold for scrap metal. When we had our CSA farm in Montana we needed a place to store vegetables to eat through the winter. We also wanted a place to keep the veggies cool while we prepared them for delivery in the summer season. We had so many rocks on our property that I was thinking about building a circular root cellar, using a rock wall that by design would keep the walls from caving in. That’s where the thought process started, circular things that would hold up to the pressures of dirt pushing against them. I was thinking about culverts at the time, and it led me to thinking about grain bins. Gigantic culverts! I’d always see what seemed to be abandoned grain bins in the fields along the highways and thought that maybe some farmer would be interested in selling one of them. So I checked into it. Low and behold, a farmer friend of ours knew somebody who tore down grain bins for scrap on the side, so I called him. He had two to choose from at the time, so I picked the 16 foot high by 18 foot diameter one. He said if I paid the $200 he would get for the scrap metal I could have it. SOLD!”

Read the entire article with step-by-step photos of construction at the source: Homestead Haven

Read Full Post »

Attached greenhouses have numerous advantages in addition to just growing plants.

Attached greenhouses have numerous advantages in addition to just growing plants.


“Building your own greenhouse is a great idea if you are a gardener and want space to start seedlings, or grow plants that require a longer growing season than your climate can normally provide.

But a standalone greenhouse is one thing — an attached greenhouse design for your house brings in a whole other host of benefits to be considered that extend beyond the conveniences of growing food more easily.

Read on ahead to learn about all the reasons to consider an attached greenhouse design for your home — they include providing additional free heat, extending living space, and supplying space to grow food for a longer period of time.”

Read the entire article at the source: The Year of Mud
And while you’re there, check out Ziggy’s Timber Frame Workshops at Dancing Rabbit Ecovillage.

Read Full Post »

Older Posts »